A lot have changed between Azure Service Management (ASM) and Azure Resource Manager (ARM) and lets quick list the terminologies and details of ARM fundamentals
- Resource – Virtual Machines, Storage Accounts, WebApps, Databases, Virtual Networks etc
- Resource Group – A container which can hold resources that related.
- Resource Provider – Microsoft.Web, Microsoft.Compute, Microsoft.Storage are example of Resource Providers, which provides the services that you can deploy, manage through Resource Manager
- Resource Manager Template – A JSON files that defines one or more resources to deploy to a resource group, can define dependencies between deployed resources
With all the above review, lets see how we can establish a data connection from on-prem network to Azure Virtual Network by creating a Site2Site IPSec VPN. You can actually choose to deploy Resource Manager Template and PowerShell combination or use the Azure Portal GUI to create the VPN tunnel.
Pre-Requisites
- On-premises network gateway device capable of IPSec site to site VPN (specifically IKEv2 for Site2Site & IKEv1 if you plan to have Point2Site along with Site2Site)
- Azure Subscription with a GatewaySubnet and Server Subnet (Please note you need a least of two IP network address for Azure Subnets that don’t overlap with on-premise IP network addresses)
Upon completion of this configuration you network should look something similar to below schematic

Azure Configuration
The subsection will describe the various configuration process to create the Site2Site Azure end configuration
Step 1 – Azure Virtual Network
Navigate from +New -> Networking -> and select Virtual Network to create a ARM virtual network to facilitate communications between Azure Networks to On-premise data networks.
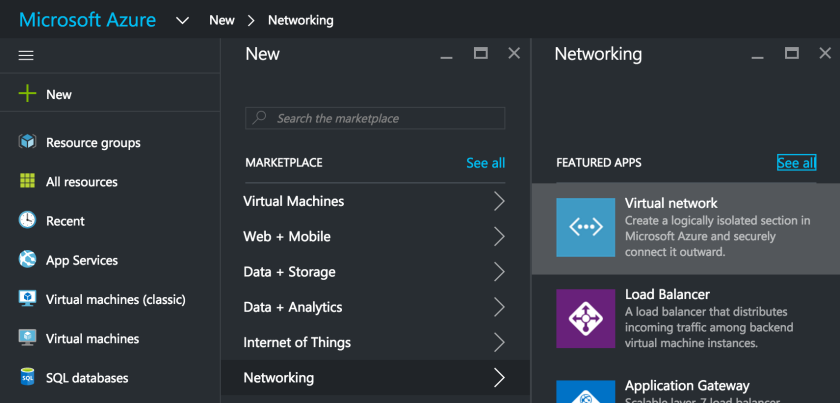
Make sure you select the deployment model as Resource Manager in the new blade and click Create
Fill in the needed information on the newly opened Blade for the new Virtual Network
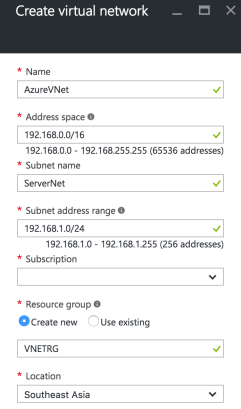
Most Importantly select an Address Space that doesn’t overlap with your on-premises IP Network address. Also for the sake of simplicity of subneting, we choose 192.168.0.0/16 as Address Space and 192.168.1.0/24 for ServerNet and 192.168.0.0/24 for GatewaySubnet. Click on the blue Create button to start the Virtual Network creation process.
Step 2 – Subnets Configuration
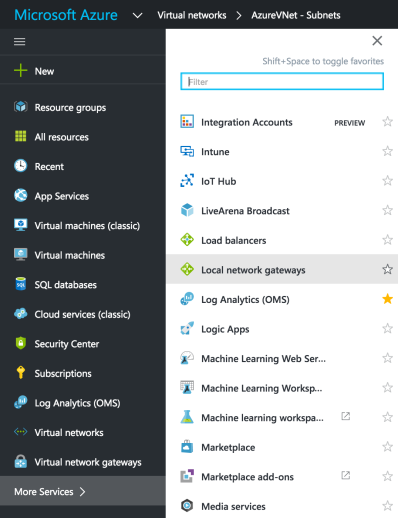
Upon successful creation of Virtual Network we need to configure the required subnets, particularly the GatewaySubnet by Navigating to Virtual Networks -> AzureVNet -> Subnets -> and click on +GatewaySubnet

Step 3 – Local Subnet Gateway
Step 1 & 2 confirms the creation of Virtual Network named AzureVNet. Now we proceed to create the Local Subnet Gateway which essentially takes care of network routing between on-premise network and Azure Virtual Network.
Choose the Local Network Gateways and in the new blade fill in the needed details including the on-premise gateway public IP address and data network address space. Please replace IP address 11.22.33.44 with your actual on-premise network gateway’s public IP address.

Until now we have defined the network and subnets where new virtual machines can be added. Next we need to add Virtual Network Gateway
Step 4 – Virtual Network Gateway
Now we create the Virtual Network Gateway by navigating +New -> Networking -> Virtual Network Gateway and fill in the needed details on the newly opened blade and click the blue Create button.

after about 15-25 mins the Virtual Network Gateway will be created and you can see the assigned Public IP address. 
Step 5 – Connection
Now we need to complete the final step in the Azure end configuration of creating the Connection to on-premise network gateway. Navigate from Local Gateway Networks -> AzureLocalNetGW -> Connections -> Add

In the next configuration blade populate the needed information. Dont forget to create a complex Shared Key (PSK) that will be used in the IPSec VPN Phase 1 negotiation with the on-premises. Populate the Virtual Network Gateway and Local Network Gateway created in the previous steps and complete the configuration.

On-Prem Firewall Configuration
Based on the type of on-premise Network gateway device type, you can configure matching IPSec VPN Phase 1 and Phase 2 parameters. I am listing most popular configuration options which could vary for different devices. Please consult the network gateway device technical documentation for more details.
Phase 1 Proposal Options
IP Version 4, IKE Version 2, Diffie-Hellman Group 2, Authentication – PreShare Key (PSK)
Encryption – AES128 / SHA256, AES256 / SHA256, AES128 / SHA1, AES256 / SHA1
Phase 2 Proposal Options
Encryption – AES128 / SHA256, AES256 / SHA256, AES128 / SHA1, AES256 / SHA1
